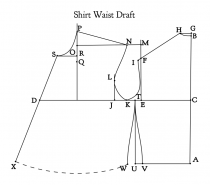
This diagram and the instructions below were re-created from Practical Sewing and Dressmaking, Sara May Allington, Boston: Dana Estes and Company, 1913.
1. Draw Line A-B length of Back Length measure.
2. From A measure on line A-B Underarm measure. Mark this point C.
3. At C square a line with A-B.
4. From C measure on this line one-half of Bust measure. Mark this point D.
5. From C on line C-D measure one-half of Back Width measure. Mark this point E.
6. At E square line with line C-D.
7. From E on this line measure 1-3 of Armhole measure. Mark this point F.
8. Measure 1/2 inch above point B. Mark this point G.
9. At G square a line with line G-A.
10. From G on this line measure 1-1/2 inches. Mark this point H.
11. Place point O on the chart at point B and draw curve through H.
12. With curve D-C on the chart draw a curve through H and F.
13. Extend this curve beyond point F 1/2 inch. Mark this point I.
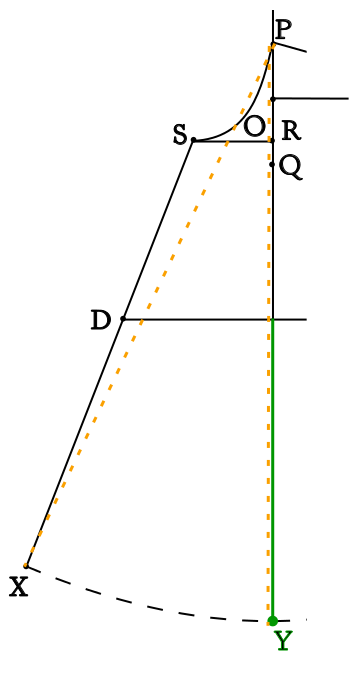
14. From E measure on line C-D 1/4 of Armhole measure. Mark this point J.
15. Find a point half way between J and E. Mark this point K.
16. At point J square a line with line D-C.
17. From J on this line measure 2-1/2 inches. Mark this point L.
18. Place point G on the chart at point I and draw curve through K.
19. Place point O on the chart at point L and draw curve through K.
20. Extend line E-F up 1-3/4 inches. Mark this point M.
21. At point M square a line with line E-M.
22. From M on this line measure 2 inches. Mark this point N.
23. Place point F on the chart at L and draw a curve through N.
24. Measure curve I-H.
25. From N measure the line of line I-H. Mark this point O. [NOTE: This should be from M, not N] <–My mistake! It really is N! -sspencer
26. Square a line with D-C so that it will pass through point O.
27. Measure from line D-C on this line, the Upper Front measure less what is used on the Back Neck. Mark this point P.
28. From point P measure down 1/4 of neck measure. Mark this point Q.
29. From Q measure up 1/2 inch. Mark this point R.
30. At R square a line with line Q-R.
31. On this line from R measure 1-6 of Neck measure, and add 1/4 inch. Mark this point S.
32. Place point J on the chart at S and draw curve through P.
33. From point E on line C-D measure 1 inch to the left. Mark this point T.
34. At T square a line with line C-D and draw length of Underarm measure. Mark this point U.
35. From U measure 1 inch to the right. Mark this point V.
36. Place point B on the chart at point T and draw curve through V.
37. From U measure 1 inch to the left. Mark this point W.
38. Place point B on the chart at point T and draw curve through W.
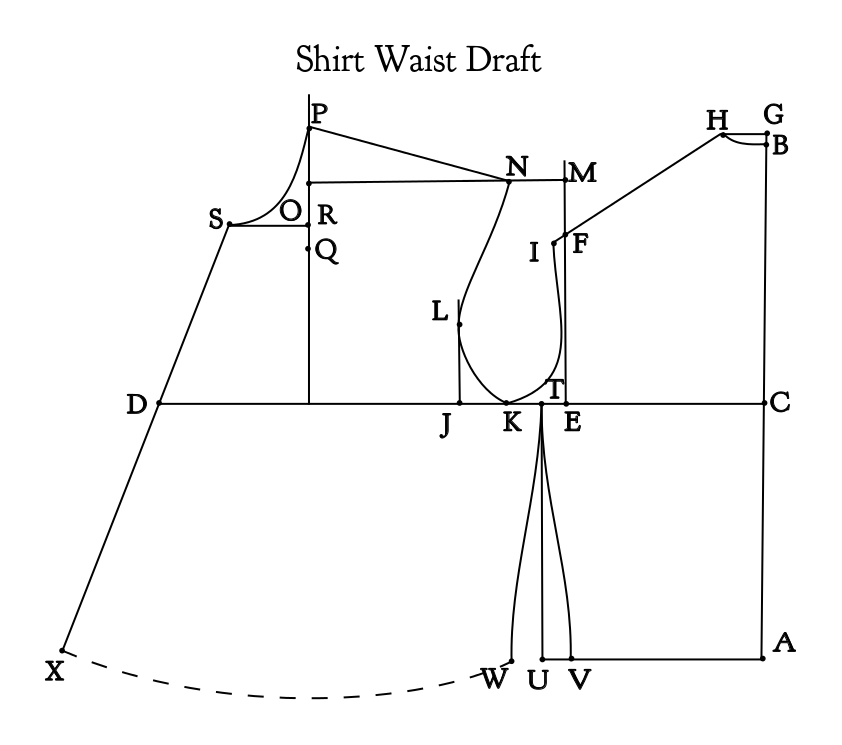
39. Draw a line from S through D.
40. From S measure Front Length measure. Mark this point X.
In cutting pattern allow all seams.
STEP 1: TRANSLATE THE MEASUREMENT TERMS
Here is a translation of the measurements into Tau Meta variables:
Waist measure == waist_circumference
Neck measure == neck_circumference
Armhole measure == armscye_circumference
Bust measure == bust_circumference
Back Width measure == across_back
Upper Front measure == upper_front_height
Front Length measure == front_waist_length
Underarm measure == side
STEP 2: TRANSLATE THE INSTRUCTIONS INTO PSEUDO-CODE
Here is the translation of the above instructions into points that are represented as an x,y pair or as a TauMeta function that returns a point. IN is a constant variable to use for inch values.
B=0, 0
A=downPoint(B, front_waist_length)
C=upPoint(A, side)
D=leftPoint(C, bust_circumference/2.0)
E=leftPoint(C, across_back/2.0)
F=upPoint(E, armscye_circumference/3.0)
G=upPoint(B, 0.5*IN)
H=leftPoint(G,1.5*IN)
I=intersectLineAtLength(F,H, -0.5*IN) #This is odd usage for this function, but it’s efficient. Think of it as starting at F facing H, then move backwards 0.5 inch.
J=leftPoint(E, armscye_circumference/4.0)
K=midpoint(J,K)
L=upPoint(J.x, 2.5*IN)
M=upPoint(F.x, 1.5*IN)
N=leftPoint(M, 2*IN)
O=leftPoint(M, distance(H,I))
P=O.x, C.y-upper_front_height
Q=downPoint(P, neck_circumference/4.0)
R=upPoint(Q, 0.5*IN)
S=leftPoint(R, (neck_circumference/6.0)+0.25*IN )
T=leftPoint(E, 1*IN)
U=downPoint(T, side)
V=rightPoint(U, 1*IN)
W=leftPoint(U, 1*IN)
X=intersectLineAtLength(S, D, front_waist_length)
STEP 3: ADD ADDITIONAL POINTS IF NEEDED
A new point is needed to draw the waistline: Y will be on on the waistline directly below P. Let’s assume that the drawing is somewhat accurate so the waistline directly below P has the same distance from P as X.
The formula for this point is Y=downPoint(P, distance(P, X))
A second new point is needed on the back armscye above E, similar to L on the front armscye above J. Let’s assume that this point can be 2/3 the distance from the shoulder tip to the underarm line.
The formula for this point is Z = downPoint(F, (2/3.0)*distance(F, E))
The third and final new point is needed above T on the armscye curve between K & Z. This point will finish the separation line between the front and back bodice pattern pieces. The curve points are stored in an array. We haven’t calculated the bezier curve’s control points yet, and you may not yet know what a bezier curve is, but let’s roll with this for a minute.
Bezier curves are defined with four points. The bezier curve from K to Z is, in order: point K, control point Z.c1, control point Z.c2, point Z.

The formula to create the curve array is curveKZ=pointList(K, Z.c1, Z.c2, Z)
We’ll cover how to calculate the control points later in this post series.
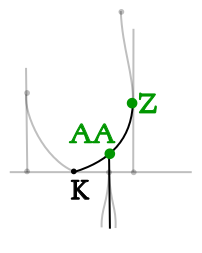
The formula for finding the point where line T-U intersects curve K-Z is AA=intersectLineCurve(T,U,curveKZ)
STEP 4: RENAME THE POINTS
Creating a Pattern with an Inkscape Extension will continue in the next blog post…
You must be logged in to post a comment.